In this article, I will walk you through the process of setting up DMARC, SPF, and DKIM for your email accounts using Namecheap and Google Workspace, ensuring a higher level of email security and authenticity. Let’s start digging!
1. Understanding DMARC, SPF, and DKIM
Before diving into the setup process, let’s briefly explain the purpose and benefits of each of these email authentication protocols:
- DMARC (Domain-based Message Authentication, Reporting, and Conformance): DMARC helps prevent email spoofing by allowing domain owners to specify how email receivers should handle unauthenticated emails. It ensures that only legitimate emails are delivered to recipients and provides valuable reporting on email activity.
- SPF (Sender Policy Framework): SPF verifies that incoming emails originate from authorized servers by cross-checking the sender’s IP address against a list of authorized IP addresses. It helps combat email forgery and ensures that emails sent from your domain are genuine.
- DKIM (DomainKeys Identified Mail): DKIM adds a digital signature to outgoing emails, allowing recipients to verify the authenticity of the sender and detect tampering or spoofing. It works by signing outgoing emails with a private key, and the receiver’s server can verify the signature using the corresponding public key published in your domain’s DNS records.
2. Setting Up DMARC, SPF, and DKIM in Namecheap
Step 1: Access your Namecheap Account.
Log in to your Namecheap account and navigate to the dashboard.

Step 2: Manage your DNS Records
Search for the domain for which you want to set up DMARC, SPF, and DKIM. Access the “Manage DNS Records” section for that domain.

Step 3: SPF Record Configuration
Create a new TXT record and enter your SPF information. The SPF record typically starts with “v=spf1” and includes the IP addresses or domains authorized to send emails on your behalf. For example:
Host: @
Value: v=spf1 include:_spf.google.com ~all
Step 4: DKIM Configuration
In your Namecheap DNS settings, look for the “DomainKeys (DKIM)” section. Generate a DKIM key for your domain and add it as a TXT record in your DNS settings. The DKIM record should look like this:
Host: google._domainkey
Value: Long TXT as shown in the screenshort.

Start Authentication>

Step 5: DMARC Record Setup
Create a new TXT record for your DMARC policy. The DMARC policy will specify how receivers should handle unauthenticated emails from your domain. An example DMARC record is as follows:
Name: _dmarc
Value: v=DMARC1; p=none; rua=mailto:name@yourbusiness.com
If multiple, use " , " : v=DMARC1; p=none; rua=mailto:name@yourbusiness.com,mailto:name@yourbusiness.com

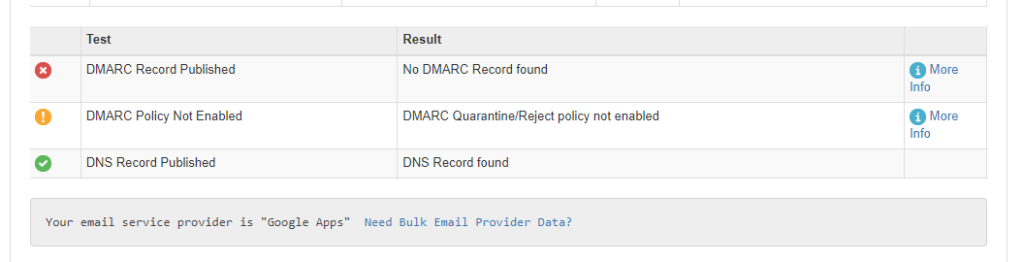
DMARC Policy Not Enabled
DMARC Quarantine/Reject policy not enabled

It may take up to 48 hours for DNS changes to fully propagate.
3. Configuring DMARC, SPF, and DKIM in Google Workspace

Step 1: Access your Google Workspace Admin Console
Log in to your Google Workspace Admin Console using your administrator account.
Step 2: Navigate to “Apps” and then “Google Workspace“
Click on “Apps” and select “Google Workspace” from the list of available applications.
Step 3: Access “Security” Settings
Inside the Google Workspace Admin Console, click on “Security” to access security settings.
Step 4: Set Up SPF and DKIM
Under the “Authenticate Email” section, click on “Set up” for both SPF and DKIM. Google Workspace will provide instructions and unique values that need to be added to your domain’s DNS records in Namecheap.
Step 5: Configure DMARC
Within the same “Security” settings, go to the “DMARC” section and click on “Turn on DMARC.” Enter your DMARC policy, which can be the same as the one you set in Namecheap.
3. How to add MX records
- At the bottom of the Records table, click Add.
- From the Type list, select MX.
- In the Host field, enter @. (If @ causes an error leave this field blank).
- In the Points to field, enter aspmx.l.google.com. (Don’t include a period at the end of the record).
- In the Priority field, enter 1.
- In the TTL field, leave the default value.
- Click Save.
- Repeat steps 1–7, entering the remaining MX server address values from the table below and setting the Priority values.
| Value | Priority |
|---|---|
| ASPMX.L.GOOGLE.COM | 1 |
| ALT1.ASPMX.L.GOOGLE.COM | 5 |
| ALT2.ASPMX.L.GOOGLE.COM | 5 |
| ALT3.ASPMX.L.GOOGLE.COM | 10 |
| ALT4.ASPMX.L.GOOGLE.COM | 10 |
Conclusion
By setting up DMARC, SPF, and DKIM for your email accounts through Namecheap and Google Workspace, you can significantly enhance your email security and protect your domain from email spoofing and phishing attempts.
These authentication protocols ensure that your emails are delivered safely and thus your recipients will trust the authenticity of your messages.
Taking these steps demonstrates a commitment to safeguarding your online presence and maintaining a trustworthy communication channel with your clients, customers, and colleagues.
Read: Domain and Configure MX, SPF, DKIM, and DMARC in Zoho

Hi, I’m Md Tangeer Mehedi — a Cold Email Outreach Specialist. I help B2B brands attract new leads and clients with proven outreach strategies. My focus is on appointment setting and building cold email systems that deliver consistent results.